While many of us may be too young to remember, writers would use typewriters before Word Processors, and writing apps existed.
They worked to keep the line of text at a set position while the paper moved as you typed. Doing so made it easier to focus on what you were writing and improved posture. Without typewriter scrolling, the cursor can quickly reach the bottom of the screen. Unfortunately, it causes you to look down while writing and often leads to neck and back pain from extended writing sessions.
Like most word processors, Scrivener also offers a tool to replicate typewriter scrolling – called ‘typewriter mode.’
These days, typewriters may almost be a distant memory for most writers, except when used as a cool vintage prop. But that doesn’t mean you can’t take advantage of typewriter scrolling with modern software like Scrivener.
With typewriter mode enabled, you just have to write as usual. Then, the screen automatically moves up when the text wraps around the margin. So, the cursor stays in the middle of the screen.
It is straightforward to enable or disable the Scrivener typewriter mode.
Let’s find out how!
Scrivener Typewriter Mode Default Settings
The default settings for the typewriter scrolling in Scrivener are as follows:
For the Editor, typewriter mode is disabled.
For Composition Mode, typewriter mode is enabled.
It is quick and easy to switch between enabling and disabling typewriter scrolling in both the editor and composition mode.
How To Enable Scrivener’s Typewriter Mode
You can turn Scrivener into a modern, digital typewriter and keep the line you are writing or editing in the middle of your screen.
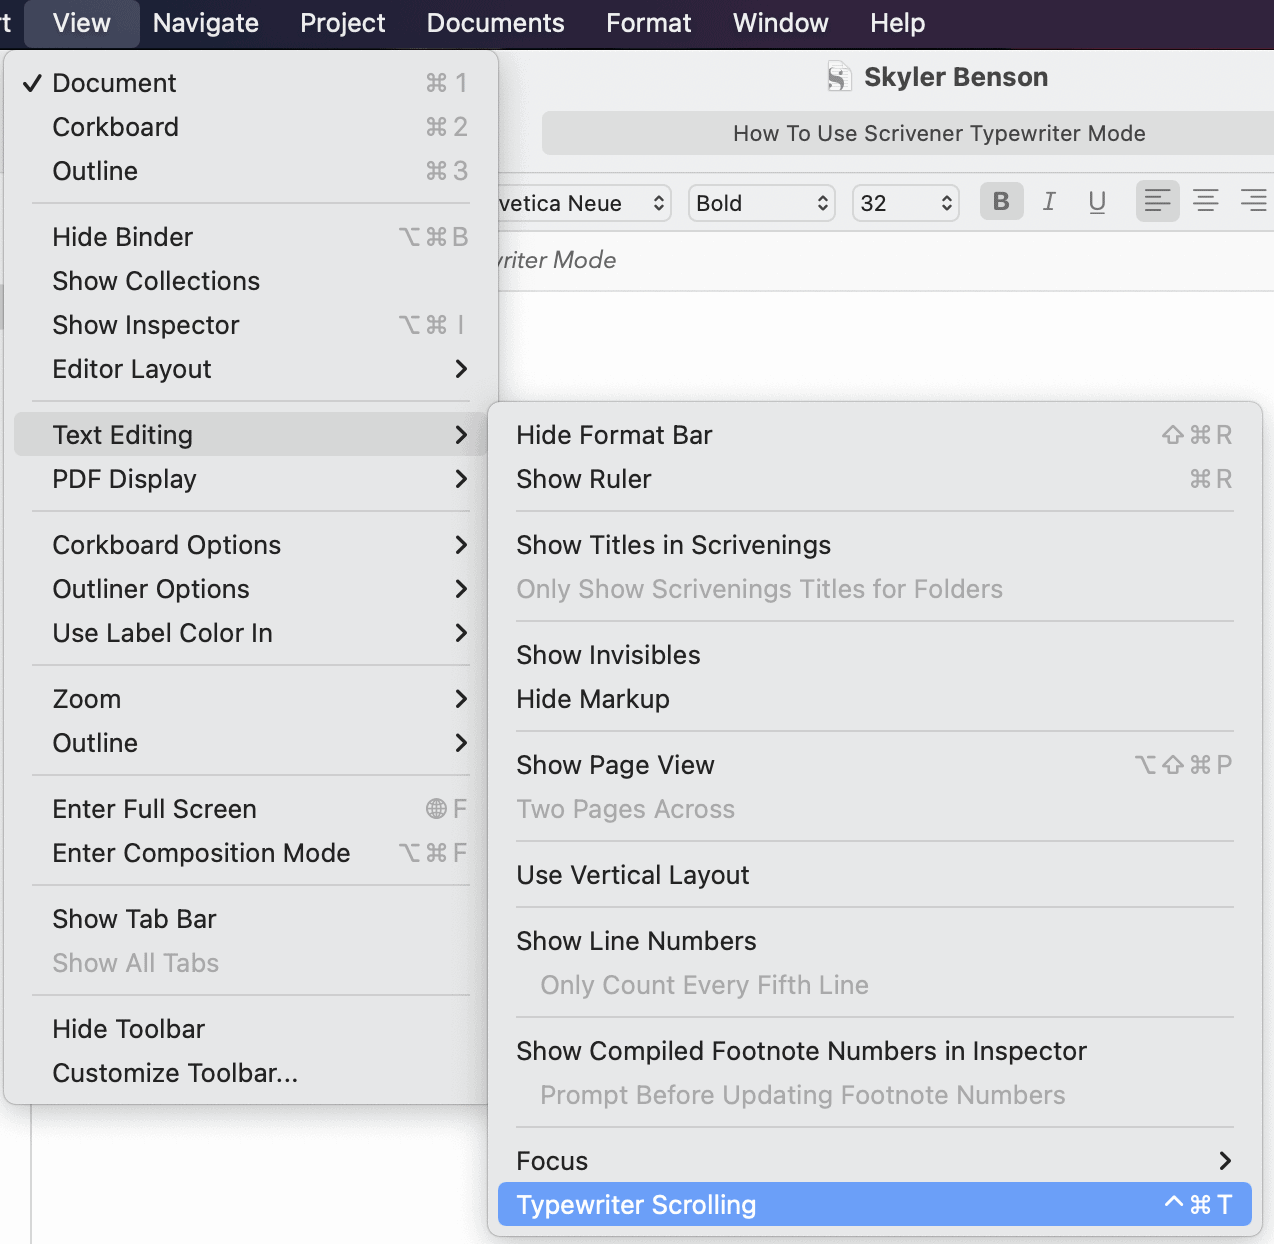
To enable or disable typewriter mode on both Mac and Windows, go to the View menu:
View > Text Editing > Typewriter Scrolling
Or you can use keyboard shortcuts:
- Mac: Command + Control + T
- Windows: Win + Ctrl + T
But, unlike a traditional typewriter, Scrivener gives much more customization to tailor the software and page precisely to your needs.
To change the typewriter scroll line, you need to go to the Scrivener menu on Mac:
Scrivener > Preferences
For Windows, it is under the File menu:
File > Preferences
Then click on the Editing tab at the top of the preferences list.

Now you will see the Typewriter scroll line, which defaults to Middle of editor.

You can then click the arrows to change the line location and configure where on the screen you want the typewriter scroll line to be in your document.

The available options include:
- Top quarter of editor
- Top third of editor
- Middle of editor
- Bottom third of editor
- Bottom quarter of editor
Try out each one to find the most comfortable one for you.

You can also check a box you can check for typewriter scrolling always jumps to scroll line.
If you enable this option, when you click anywhere else on the page, Scrivener will automatically re-center the text to whichever line you clicked on.
For writing, this may be a helpful feature. but for editing, it can become highly frustrating, and it is better to uncheck it.
Typewriter Scrolling in Composition Mode
As well as the Editor window, Scrivener typewriter mode also works in Composition Mode. It is a full-screen, distraction-free interface that allows you to focus on writing.
You can access Composition mode under the View menu:
View > Enter Composition Mode

When you enter it for the first time, you will see a popup notifying you that Typewriter scrolling is enabled.

The official Scrivener definition is “typewriter scrolling keeps the line on which you are typing at a fixed position on-screen’.
If you’ve been moving your cursor around your document, you can quickly ‘jump to selection’ to re-center the typed line.
You can find it under the Edit menu:
Edit > Find > Jump to Selection
Or use the keyboard shortcut keys:
- Mac: Command + J
- Windows: Control + J
You can either disable typewriter mode or keep it enabled directly from the popup.
There is also another way to toggle between enabling or disabling it.
If you hover the cursor over the bottom of your screen, a hidden menu bar will appear.

Just click the typewriter icon.
If it is light, then it is enabled
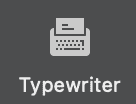
If it is dark, then it is disabled.

Typewriter scrolling also works with the iOS app for both iPhones and iPads.
You can also choose between 5 different paper alignment positions and the paper width. These options allow you to further customize your page to suit your preferences, much like you would be able to with a traditional typewriter.
Final Thoughts
Scrivener lets you turn your laptop or PC into a modern-day typewriter with the click of a single button. It’s much less bulky and noisy too! It is also more environmentally friendly since you won’t use any actual paper.
Many writers have different preferences when it comes to a typewriter mode. Some writers swear by it, while other writers absolutely hate it.
I could never really get used to using typewriter scrolling as I grew up typing on computer keyboards. But, I occasionally use it from time to time when I need to be super focused.
Check out the typewriter scrolling feature and see if you like it for your own writing.